Steps to setup a SQL Server Java Connections
1) You need to download the sql server jar library from
Microsoft. You can do this at the following link:
For help with the jdbc, you can go to http://msdn.microsoft.com/en-us/sqlserver/aa937724
- download sqljdbc_4.0.2206.100_enu.exe
by
clicking on
the dowload button
- the file will be 4.2 Mbytes in size.
- Run the exe file, it will ask for a location to unzip the files
into, use the browser button to select a folder, then press the top
"Unzip" button
- This will unzip the file into the selected folder. with the
following folder structure:
- sqljdbc_4.0
- enu
- auth
- help
- xa
- install.txt
- license.txt
- release.txt
- sqljdbc4.jar
- sqljdbc.jar
2) Inside the help folder you can open default.htm and read information
about using the drivers. For our purposes we will include the
sqljdbc4.jar in our projects.
3) To include this in the project do the following:
- first create your project
- then copy sqljdbc4.jar into your project folder using "My
Computer"
- In Netbeans, from the Projects window, right click on your
project and open its properties.
- In the categories window select "Libraries"
- Click on the "Libraries" category
- Select Add JAR/Folder
- Browse to the location of sqljdbc4.jar and select it
- Finally press the ok button.
3a) If you are doing a web project,
then you can just add the driver to your apache tomcat lib folder, that
is, copy sqljdbc4.jar into C:\Program Files\apache-tomcat-7.0.22\lib,
the location on your computer may be different.
4) Your project should now be able to access the SQLServer files it
needs to connect to a SQL database.
5) To access SQLServer in your program you need to refer to the
correct driver and connect to your database. The example below
assumes that SQLServer is installed on your machine, replace
localhost with the actual url if its in a different location. Also
you'll need to replace the databaseName, user, and password to match
your actual database.
try{
     Class.forName("com.microsoft.sqlserver.jdbc.SQLServerDriver");
// load the driver
     // line below needs to be modified to
include the database name, user, and password (if any)
con = DriverManager.getConnection("jdbc:sqlserver://localhost:1433;databaseName=database;user=user;password=password;");
     System.out.println("Connected to
database !");
}
catch(SQLException sqle) {
      System.out.println("Sql Exception
:"+sqle.getMessage());
}
catch(ClassNotFoundException e) {
    System.out.println("Class Not Found Exception
:" + e.getMessage());
}
6) Now you can use the con variable
as you have in the past to issue
SQL operations.
Using Netbeans Database Services
To connect Netbeans to a SQLServer database dio the following:
- Go to the "Services" window, right click on the "Databases" item,
select "New Connection" from the menu
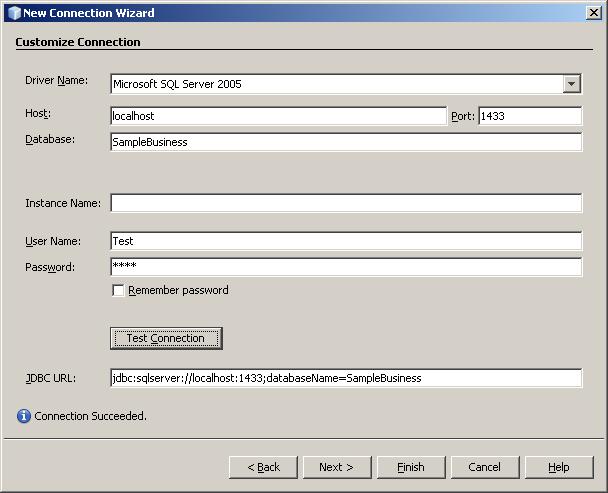
- This will display the "New Connection Wizard"
- Drop down the "Driver" list and select "New Driver"
- Press the "Add" button and, then navigate to the
sqljdbc4.jar, and press ok
- Press the Next button at the bottom of the New Connection
Wizard window
- This will allow you to customize the connection to your database
- use "localhost" for the host if you are connecting to a
database on your machine
- use port 1433
- fill in the database, user name, and password
- Press the Test button to check the connection
- Press Next once you have it working


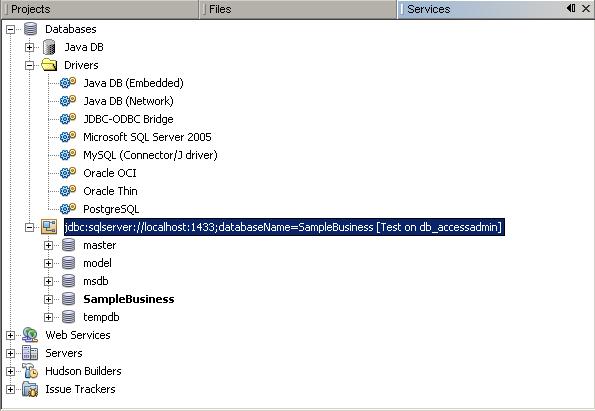
- You should now have a database connection in the window (see
above)
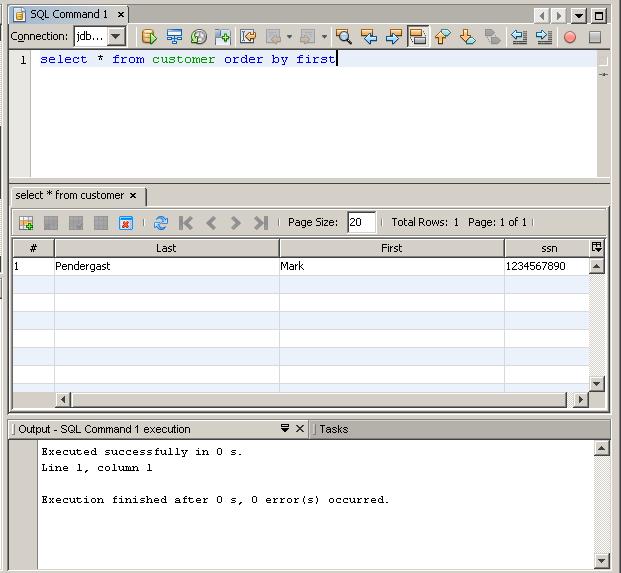
- You can now right click on the connection and select "Execute
Command"
- this wil open a SQL window that will allow you to manually enter
SQL Commands
- Here you can type in SQL commands then press the run SQL
button (yellow cylindar with green arrow) to execute them.
