Chapter 9 - Graphical User Interfaces
|
Chapter Objectives:
-
Acquire familiarity with the Swing component set.
-
Understand the relationship between the AWT and Swing.
-
Have a better understanding of Java's event model.
-
Be able to design and build simple Graphical User Interfaces (GUI)s.
-
Appreciate how object-oriented design principles were used to extend
Java's GUI capabilities.
|
Index :
|
AWT vs Swing
-
AWT and Swing are collections of JAVA objects that can be used to build
graphical user interfaces. They include objects for windows, buttons, listboxes,
etc.
-
The original AWT (Abstract Windowing ToolKit) was suitable for Java applets
but not for full fledged application development.
-
AWT 1.1 (JDK 1.1) had better event handling but did not have enough GUI
components and was too dependent on (nonportable) native code.
-
In 1997 Netscape and Sun developed a set of GUI classes written entirely
in Java. The Java Foundation Classes (JFC), including the Swing component
set, were released with JDK 2.0.
-
A Swing program can have the same look and feel on a Mac, Windows, or Unix
platform.
-
In this class we will be building applications using Swing objects.
You may still have use for the older AWT objects for creating old-style
JAVA applets (chapter 4).
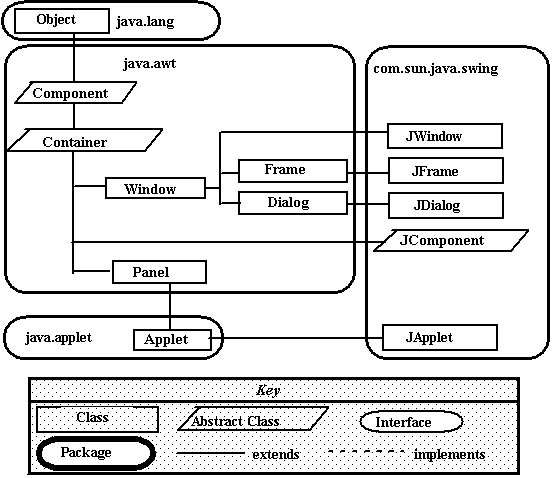
Figure 9-1 Swing Classes Part 1.
Swing Objects of note:
-
You will be using JFrame
as the basis for creating the "main" window in your applications.
-
You will use JApplet
as the basis for creating JAVA applets that are run from web pages using
the applet plug-in.
-
You will use JDialog
as the basis for creating pop-up dialog boxes and forms.

Figure 9-2 Swing Classes Part 2
More Swing Objects:
-
JComponent
: Component objects provide the interaction between the user and the interface.
There are a multitude of classes built from JComponent, each provides a
different interface control. Some of the common ones are:
-
JButton
: Creates a simple push button. It may have text or an icon on it. When
it is pressed an event is triggered and sent to owning frame.
-
JTextField
: Creates a text entry box on the panel.
-
JLabel
: Creates a label on the panel. A user entry area usually consists
of a JLabel followed by a JTextField.
-
JCheckBox
: Creates a simple checkbox with a text title.
-
JRadioButton
: Creates a radio button. Unless it is added to a ButtonGroup object it
will act independently of other radio buttons.
-
ButtonGroup
: Creates an object that controls groups of buttons, allowing only one
to be selected at a given time.
-
Canvas
: Creates an object that can be used to draw graphics with lines, circles,
rectangles, etc.
-
JToolBar
: Creates a toolbar object to which buttons can be added.
-
JMenuItem
: Creates a menu item object that can be added to a JMenu
-
JMenu
: Creates a popup/pulldown menu containing JMenuItems.
-
JMenuBar:
Contains JMenu items and displays them.
-
Swing also provides complex controls like JTable
for the easy creation of spreadsheets, JOptionPane
for simple popup message boxes, FileDialog
and JFileChooser
to ask users for file names, and JTabbedPane
to create tabbed forms.
Creating a frame
-
In order to implement a GUI interface in a JAVA application it is necessary
to first create a JFrame.
-
The Frame is the object that is the master of all the other interface
objects. A JFrame controls what goes on the banner/title line, the open/close/minimize
boxes. A JFrame has the ability to display one Panel in its content area.
The Panel in turn displays components such as buttons and text boxes. The
JFrame constructor would typically set its layout manager and add components
to its panel.
-
It is best to create a new class that extends JFrame, within its constructor
you can add the code to initialize the frame and to create all the components.
-
Java automatically sets the icon to a cup of coffee. If you don't like
this, then your frame can change it to something else by first loading
an image, then setting the image. To do this first create an ImageIcon
object (named ic) and load it with a gif picture. Then use the setIconImage
method (inherited from Frame) tell the frame to use the image. Note: since
the setIconImage method expects an object of type Image, then I have to
use the getImage method of ImageIcon (confusing? I thought so too).
The following code can be added to the constructor of your JFrame class
to change the icon.
ImageIcon ic = new ImageIcon("myicon.gif"); // load
an image
setIconImage(ic.getImage()); // tell
the frame to set is as its icon
-
The main routine can be placed in the same file. It should create the frame
and call setVisible to make the frame visible on the screen.
-
This example calls the super classes constructor, passing a title to it,
then sets the size of the window using setSize, and sets up what should
happen to the application if the frame is closed.
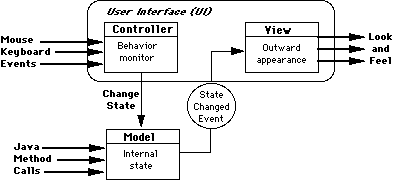
How Interfaces Work - Model-View-Controller (MVC) :
-
Swing components are composed of 3 aspects: state (model), look (view),
and behavior (controller).
-
For example, a checkbox may be in different states, checked, unchecked,
etc. Its appearance to the user will vary depending on its current state,
and its behavior is controlled by the user with the mouse.
-
Each user action is received by the controller code of the object, the
controller converts the user action into an event (change of state) and
tells the model code of the change of state, the model then passes the
change of state on to the view who updates what is displayed on the screen.
-
This behavior is built into the JAVA objects you will use to build your
interfaces (i.e. it's already coded for you). You may choose to have the
state change events passed to some of your own code.
-
For example, if you have a JCheckBox control on your page, the JCheckBox
already has all the code necessary to keep track of its state (checked
or unchecked) and to update the look of the checkbox accordingly.
-
JCheckBox also provides methods that your code can use to initialize its
state and to retrieve its current state.
-
Additionally, you may want to have the checkbox inform some of your code
whenever it's state changes. You do this using Event Listeners.
-
The Look and Feel of the interface can be changed to mimic various platforms
(e.g. Motif, Windows, Metal, etc.)
Handling Events
-
Events are generated by the operating system and the JAVA Virtual Machine
in response to user actions that change the state of a component. For example,
a check box has been checked, a list item has been selected, a button has
been pressed, etc.
-
At the time your code creates the component, you have the option of telling
the component which (if any) object should be notified of the state change.
To do this you tell the component to add an event listener. For example,
the following code creates a JButton object and tells it to send ActionEvents
to the creating object.
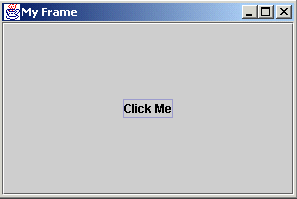
JButton clickme = new JButton("Click Me");
clickme.addActionListener(this);
-
Any class that is to receive events must implement the correct type
of listener and provide a method to receive the events. The following code
does this for a simple frame (this is similar to the code in figure 9-5).
For example, a class that is to receive events from a JButton must implement
ActionListener and provide an actionPerformed method.
Click here to view the code
-
A second way to implement listeners is via inner classes. An inner
class is a class defined within a class.
-
In this method, you create a separate inner class to listen for events
for each component. That is, if you have 3 buttons, then you would create
3 inner classes (each with a different name).
-
Each inner class would have the code required to process the events for
its particular control.
-
Inner classes also have access to the attributes of the outer class.
-
There are 2 advantages to inner classes
-
your actionPerformed routine does not have to figure out what component
caused the event. This code usually consists of a lot of embedded if-then-else
statements.
-
code to handle each action is separated, thereby reducing the risk of breaking
one listener when you add or try to fix another
-
your actionPerformed methods are shorter, thereby easier to code, debug,
and reuse!
-
Caution, when you use the this variable
with in the inner class you will be referencing the inner class object,
if you want to reference the outer class object then you can add the outer
class name before the this, e.g. if your outer class name is MyFrame, then
within an inner class you can reference the outer class using MyFrame.this,
an example of this is shown later with the JOptionPane example.
Click here to view the second example
Other Notes on Events:
-
There are many event types, ActionEvents, MouseEvents, KeyEvents, ItemEvents
to name a few. Reference tables 9.1 and 9.2 for a larger list.
-
Each event type requires you to implement a different listener. Each listener
type requires you to provide 1 (or more) methods to handle the events.
-
As the author discusses, it is also possible to use something called anonymous
inner classes. This consists of event processing code buried within
the call to addxxxListener requests, e.g. the following code from the Converter
example (see below) was added to handle the windowClosing event. This is
a shortcut that makes for hard to read code.
f.addWindowListener(new
WindowAdapter() {
public void windowClosing(WindowEvent e) {
System.exit(0);
}
});
-
The only advantage to doing this over regular inner classes is that you
are not required to implement methods for every event handled by the event
listener. In the case of the WindowListener event, it would save you from
writing methods (that don't do anything) for about 6 events (windowActivated,
windowIconified, windowClosed, to name a few). In the case of the ActionListener
it wouldn't save you any coding.
Designing a JAVA GUI
Basic User Interface Tasks:
-
Provide help/guidance to the user.
-
Allow input of information.
-
Allow output of information.
-
Control interaction between the user and device.
-
Minimize the burden on the user (number of actions required, number of
things to remember)
-
Minimize the number of components to perform a single task.
-
Design for reuse!
Example Swing objects for input, output, control, guidance:
-
Guidance: A JLabel displays a short string of text or an image. It can
serve as a prompt.
-
Input: A JTextField allows editing of a single line of text. It can get
the user's input.
-
Output: A JTextArea allows editing of multiple lines of text. It can be
used to get data or display results.
-
Control: A JButton is an action control. By implementing the ActionListener
interface it will handle the user's action events.
Choosing the top level Window
-
For applets, top-level window is JApplet.
-
For applications, a JFrame is used.
-
For popup dialog boxes JDialog is used.
-
JApplet, JDialog, and JFrame are subclasses of Container and are suitable
for holding the interface components
Choosing a Layout Manager
LayoutManagers
provide the intelligence to arrange and size components in a container.
There are several different predefined LayoutManagers available for you
to use:
-
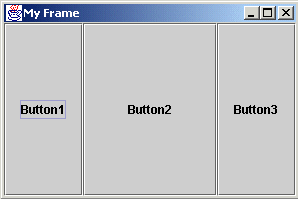
FlowLayout
: This is the default (and ugliest) of the layout managers. This layout
manager simply adds components from left to right as long as there is room.
As soon as the edge of the window is reached it starts a second line.
-
GridLayout
: This layout manager is a bit more orderly. When you create it you specify
the number of rows and columns in the grid, then it will put a component
into each cell. The cells are all the same size. This is great
for keypads and toolbars, but not so good for generic forms. Components
added to a cell are automatically resized to fit in that cell.
-
BorderLayout
: This layout manager divides the panel into 5 areas, a North area
that extends the entire width across the panel, a South area that extends
the entire width across the bottom of the panel, and West, Center, and
East areas that are arranged side by side in between. Cells in this
layout manager are of different sizes and size themselves automatically.
Any cell that does not have a component in it is not allocated any space
on the panel. BorderLayouts are a good way to organize the content area
of a Frame. For example: the North area can be used for a toolbar, the
South area for a status line, the East for a vertical toolbar, and the
center for the working area of the screen.
-
GridBagLayout
:
This layout manager provides you with the greatest amount of control over
the layout of the panel. Like the GridLayout manager, GridBagLayout places
component in cells. Unlike GridLayout, a component can occupy (span) more
than one cell and cells are not all the same size. GridBagLayouts
are the best way to arrange the fields on a form.
-
BoxLayout
: Arranges components in a single row or single column
-
others, reference table 9.3
Default Layout Managers
-
JApplet - BorderLayout (on its content pane)
-
JBox - BoxLayout
-
JDialog - BorderLayout (on its content pane)
-
JFrame - BorderLayout (on its content pane)
-
JPanel - FlowLayout
-
JWindow - BorderLayout (on its content pane)
Containment Hierarchies
-
A JFrame has one content pane (a Container object), a Container object
may hold many components, some of which may be other Containers. Each Container
can have only one layout manager.
-
This allows you divide your screen design into different areas, each area
is a separate JPanel (Container) object with its own layout manager.
-
To keep complexity under control, try to use as few JPanels as possible.
-
A containment hierarchy can be drawn up to help in the design process.
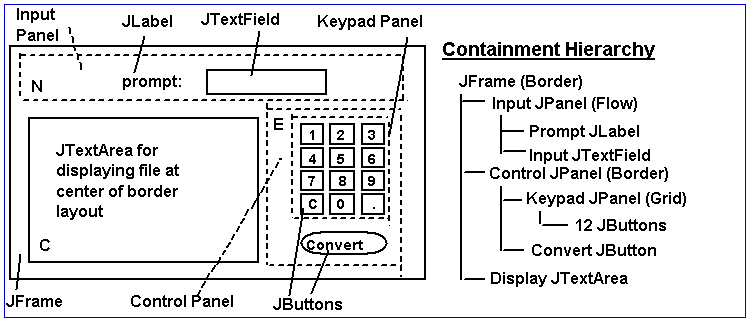
figure 9-14
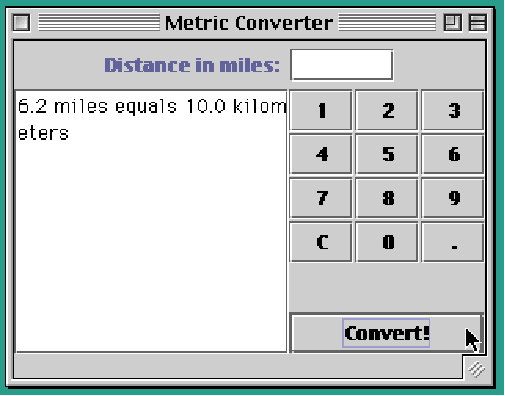
Figure 9-15
Click here to see the source code for this application
Question for thought : How could this application be rewritten
to have the same interface, but make the Keypad reusable?
Answer - Create a separate class named Keypad, it would inherit
JPanel, reside in its own file (Keypad.java), and handle setting up the
buttons on the grid and handling the button events.
-
Is used to control the formatting when you are converting floats, ints,
doubles, and longs to strings.
-
To use a DecimalFormat object you must import its definition using an import
statement. The import statement should be one of the first lines in the
java file.
import java.text.*;
-
To use a format object you must first declare and create it. This
can be done in one line. E.g.
DecimalFormat currencyFormat = new DecimalFormat("$
#,###,##0.00");
-
This line uses a pattern "$ #,###,##0.00" to specify what the resulting
number should look like when converted to a string. The "#" character refers
to a digit (0-9), leading and trailing 0's do not appear. The "0"
character represents a digit (0-9) where leading and trailing 0's will
appear. The "$ " will just be appear on front of the number. The "," characters
are grouping separators and will only appear if a digit is present on each
side of them. In this example, a number will always have a dollar
sign and at least 3 digits (one before and two after the decimal point).
-
Once the format object has been created, then it can be used when converting
numbers to strings using its format method. For example:
double salary = 29123.4403;
DecimalFormat currencyFormat
= new DecimalFormat("$ #,###,##0.00");
System.out.println("my
salary is = " + salary); // show salary unformatted
System.out.println("my
salary is = " + currencyFormat.format(salary)); // show salary
formatted
-
produces the output:
my salary is = 29123.4403
my salary is = $ 29,123.44
-
The Converter application could be improved by using DecimalFormat to limit
the number of digits. For example, when I ran the converter to convert
33 miles to kilometers, it gave the answer 53.225806451612904 kilometers.
I would have been happier with fewer decimal places. To do this you could
create an instance of decimal format that limits the number of digits after
the decimal point, then use the object to convert your number to a string.
The following was placed into the actionPerformed method. Don't forget
to add the import statement for java.text.*.
CheckBoxes, Radio Buttons, Borders
-
A JCheckBox is a button which always displays its current state
(selected or not).
-
Used to select one or more options from a set.
-
To use check boxes you need to:
-
Create a Container object (JPanel) to hold the check boxes
-
Create each checkbox
-
create the JCheckBox
-
add it to the JPanel
-
if your code needs to react to button changes, add an ItemListener to the
checkbox
-
A JRadioButton is a button that belongs to a ButtonGroup of mutually
exclusive alternatives.
-
Only one button from the group may be selected at a time.
-
To use a set of radio buttons you need to:
-
Create a Container object (JPanel) to hold the buttons, use a Box or Grid
layout manager.
-
Create a ButtonGroup object to control the behavior of the buttons
-
Create each radio button
-
create the JRadioButton
-
add it to the ButtonGroup
-
add it to the Panel
-
if your code needs to react to button changes, add an ItemListener to the
button
-
Set one of the buttons to be selected.
-
ItemEvents are associated with items that make up menus, including JCheckBoxes
and RadioButtons.
-
They are handled by the ItemListener interface, which consists of the itemStateChanged()
method.
-
Borders can be added to any JPanel by using the setBorder method,
e.g.
optionPanel.setBorder(BorderFactory.createTitledBorder("Payment
By"));
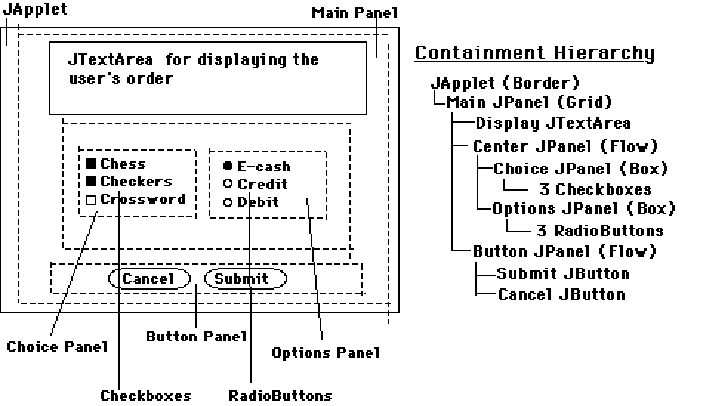
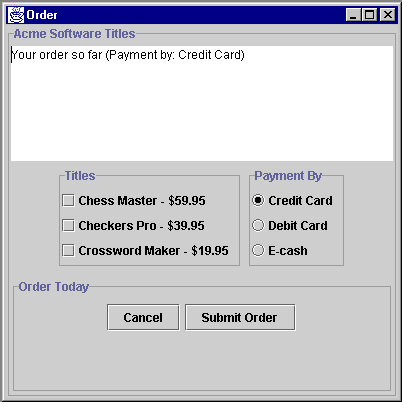
click here to see the source code for this application
Menus
-
Menus allow a program to grow without cluttering the interface with too
many buttons.
-
A JMenuBar is a horizontal list of menus.
-
A JMenu is a clickable area on the menu bar that is associated with a JPopupMenu,
a small window that displays JMenuItems.
-
JSeparators are used to group menu items
-
Adding menus is not difficult but requires attention to detail.
-
You can use a menu in many ways, this example shows how to setup the menu
bar for a frame.
-
To create a menu bar you need to:
-
Create a menu bar object (JMenuBar)
-
Create each submenu that appears on the menu bar (JMenu)
-
Add the submenus to the menu bar
-
Create each menu item that appears on the submenus (JMenuItem)
-
create the menu item and mnemonic.
-
set its accelerator key sequence (optional)
-
add an action listener
-
Add the menu items to the submenus
-
The previous four steps are repeated for each menu item, in order to save
typing (and errors) I created a method called addMenuItem to do these four
steps
-
and add the menu bar to the frame
-
In this example I created a small file menu and edit menu. I used
standard menu mnemonics and accelerators. It is important to use the virtual
key constants when specifying the mnemonics and accelerators, these are
as static variables defined in the KeyEvent object.
-
To process menu events you must implement an ActionListener.
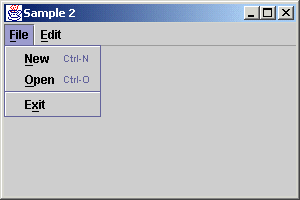
Click here for the code for this sample.
Scrollbars, JTables, Tabbed Panels
Adding scroll bars around objects.
-
Swing components don't come with scroll bars automatically. Many
objects such as JTextArea, JList, JTable, etc. need scrollbars. Adding
scrollbars is not difficult. First you create the component that needs
the scrollbars e.g. JList, then you create a JScrollPane object, passing
the reference of the component to the JScrollPane constructor. You may
also setup how the scrollbars will appear (AS_NEEDED, ALWAYS, NEVER).
-
Here I created a list box, then used that to create a scrolling list box
that always has vertical scroll bars and only shows the horizontal ones
if they are needed. The JScrollPane object can then be added to a Panel
(You don't need to add the list box since it is part of the scroll pane).
list = new JList(toons); // create a list control loaded with
character names
tab1 = new JScrollPane(list, JScrollPane.VERTICAL_SCROLLBAR_ALWAYS,
JScrollPane.HORIZONTAL_SCROLLBAR_AS_NEEDED);
-
Some controls, such as JTable, require you to do a little extra work to
make them appear as you'd like. A JTable will automatically shrink the
size of its cells to fit itself in whatever space it is allocated. To make
it behave more nicely (that is, allow the user to control the size of the
cells), you need to tell it to turn that feature off and to rely on the
scrollbars. Here I created the table, told it to turn off the autoresizing,
then created a ScrollPane using the table object.
table = new JTable(100,100); // create
a data table
table.setAutoResizeMode(JTable.AUTO_RESIZE_OFF);
tab2 = new JScrollPane(table); // add table to
a scroll pane
-
How to create a Tabbed Pane
-
Tabbed panels allow you to have several overlapped panes that each hold
something different. In this example I created a tabbed pane that has three
panes, one that holds a list of cartoon characters, one that holds a 100x100
scrolling table, and one that holds an edit object.
-
Its best to think of tabbed panes as a form of JPanel that has a built-in
layout manager to create the panes.
-
There are several approaches to creating the JTabbedPane objects, you could
create and load them entirely within the constructor of your frame then
added them to the content frame (or add them as the content frame), or
you can create a separate object that inherits the JTabbedPane class and
does all its initialization. This separate class can then be created and
used like a frame.
-
In this example, I first created the three components that I wanted to
show up on each pane, then invoked add to put each of them on their own
tab. This is done within the constructor of my separate class.
list = new JList(toons); // create a list control
loaded with character names
tab1 = new ScrollPane(list, JScrollPane.VERTICAL_SCROLLBAR_ALWAYS,
JScrollPane.HORIZONTAL_SCROLLBAR_AS_NEEDED); // make the list scrollable
table = new JTable(100,100); // create a data
table
table.setAutoResizeMode(JTable.AUTO_RESIZE_OFF);
tab2 = new JScrollPane(table); // add table to a
scroll pane
tab3 = new JTextArea(); // create an text
editor
//
// add them
//
add("Cartoon Characters",tab1); // add the
list as the first tab
add("A 100x100 Table",tab2);
// add the table/scrollpane as the second tab
add("Employee Form", tab3);
// add the form as the third tab
-
To use the separate class I simply created an instance of it within my
Frame's constructor, then added it to the content pane of the frame.
tabPanel = new TabPanel(); // create the
tab panel
getContentPane().add("Center",tabPanel);
// add it to the center area
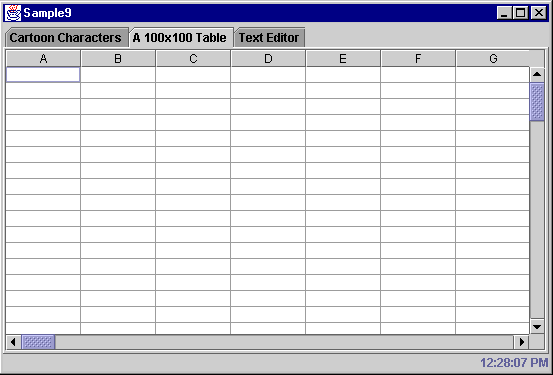
click here to see all the code
Tool Bars
-
To create a tool bar you need to:
-
Create/access a panel or container to display the toolbar on (JPanel),
most often this will be the content pane of your main frame, but it could
be any panel.
-
Create a layout manager to handle the Panel, in this case its best to use
the BorderLayout objects. This allows the toolbar to be torn off
an moved to the top/bottom/sides of the border.
-
Create a toolbar object (JToolBar)
-
Create each Button that appears on the toolbar (JButton)
-
create the button item
-
set its tooltip text (text shown when cursor lingers over the button)
-
add an action listener
-
add the button to the toolbar
-
the previous four steps are repeated for each button, in the example below
they were put into a method.
-
Finally, add the toolbar to the panel
-
In this example I created a toolbar with three buttons, one text only,
one with text and icons, and one icon only.
-
Important note, in most applications there is a menu item that corresponds
to each tool bar button. This is good practice. If you do this then you
don't need to create a separate listener class for the button and the menu
item, use the same one. This will save coding and insure that both button
and menu item do the same action.
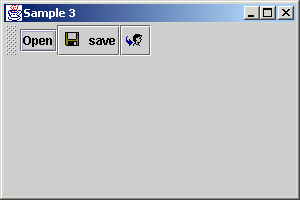
Click here to see the source for this example
Creating Forms using the GridBagLayout Manager
To create a Form you need to:
-
Create a panel to display the grid on (JPanel)
-
Create a GridBagLayout manager to handle the Panel. Cells on the grid can
be different sizes, however, the width of cells in each column is the same
and the height of cells in each row is the same. An item can span
more than one cell (similar to HTML tables).
-
Determine where each field is and how big it is. This is best done by sketching
the form, then drawing horizontal and vertical lines where the various
controls line up. Note: you are creating a grid. Only one item can appear
in each cell, however, an item may span more than one cell.
-
Look at the grid and for each item determine:
-
its grid location (x,y)
-
how many cells wide and high it is.
-
the proportion of the entire panel that it is high and wide. Note, the
layout manager will determine the actual size based on what's put in the
cells, that is, the actual width will be based on the widest control put
in the same column, the actual height will be based on the highest control
placed in the same row.
-
the fill option, i.e. how the control should be sized to fit within
the cell, there are four options for this:
-
NONE - don't change the size of the control
-
BOTH - stretch the control in both directions to fill the entire cell
-
HORIZONTAL - lengthen the control to be as wide as the cell is
-
VERTICAL - heighten the control to be as high as the cell is.
-
where within the cell the control should be placed. Note: this is not important
if the fill option is BOTH
-
CENTER - center both vertically and horizontally
-
NORTH - top align, center horizontally
-
NORTHEAST - top-right align
-
EAST - center vertically, right align
-
SOUTHEAST - bottom - right align
-
SOUTH - bottom align, center horizontally
-
SOUTHWEST - bottom-left align
-
WEST - center veritically - left align
-
NORTHWEST - top-left align.
-
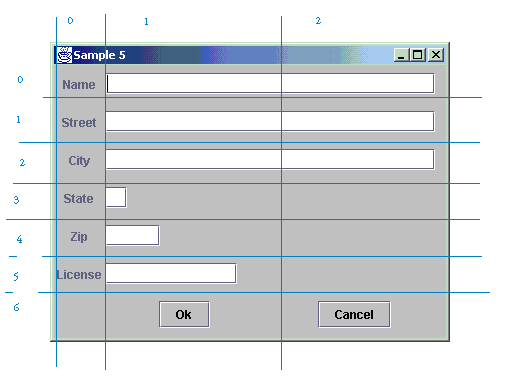
for example, the text entry field for street has the following :
-
x = 1, y = 1
-
w = 2, h = 1
-
wx ~ 60, wy~ 40
-
fill is horizontal
-
anchor is WEST
-
Create and setup each field on the form, in this example I used text, labels,
and buttons.
-
create the field item (JTextField, JLabel, JButton)
-
set up its gridbag constraints
-
row, column, row span, column span, relative sizes
-
add an action listener (if necessary, useful for buttons)
-
Add the field to the panel
-
In this example I created a form for a customer object, it has a label
and textfield for each entry plus and OK and Cancel button.
-
To process button events you must implement an ActionListener.
-
There are two ways to do this,
-
one way is to have the JFrame class implement an ActionListener, this requires
adding one actionPerformed method to your JFrame class. This method
would then have to figure out which button item (or menu, or other control)
caused it to run. getSource and instanceof methods can be used. This
sample uses this technique.
-
Another way is to create a separate listener class for each button.
This is much cleaner to implement. The class only has an actionPerformed
method. Within this method you place the code to handle the button. This
sounds like more work, but its really not.
click here to see the code
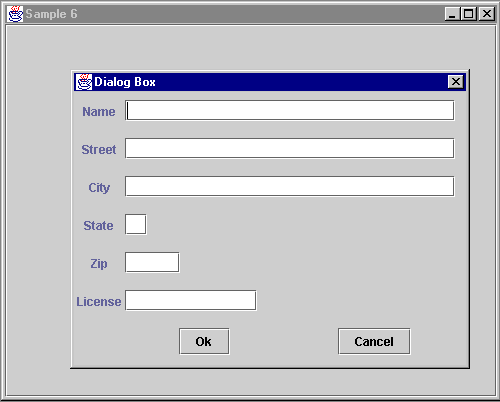
Popup Forms / Modal Dialog boxes
Creating a modal dialog box
-
A modal dialog box is one that suspends execution of the calling frame
until it exits, that is, in order for the user to access controls
on the original frame they must first exit the dialog box. Modeless or
nonmodal ones, allow the user to switch between the original frame and
the dialog box.
-
In both cases you should create an object that inherits JDialog (a standard
Swing component). In this case I created a new object called Dialog6
that inherits the JDialog object. Within its constructor it sets up its
content pane, and provides any code necessary to handle actions of the
controls.
Dialog6(JFrame parent) {
super(parent,"Dialog Box",true); // call the
super class constructor, set title and modal
setSize(400,300); // set the width of the
window to 400 pixels, height to 300.
-
To create a modeless dialog box all you need to do is to call the super's
constructor with the modal parameter set to false.
-
To use the dialog box all you have to do is to create the object then tell
it to be visible.
Dialog6 dialog = new Dialog6(this);
dialog.setVisible(true);
click here to see the code for this example
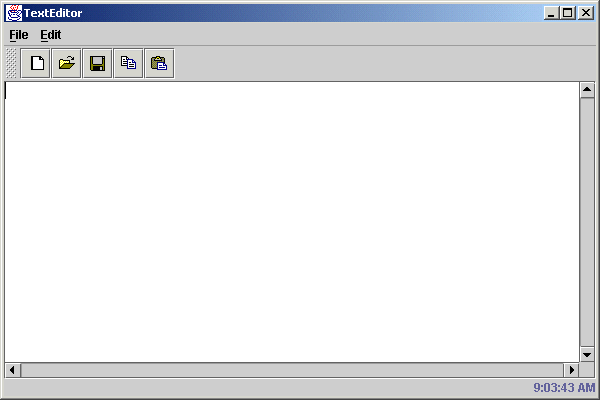
Text Editor Example (differs
from the book)
-
This example pulls it all together. TextEditor has the following:
-
MenuBar with File (New, Open, Save, SaveAS, and Exit), and Edit (Cut, Copy,
Paste)
-
Tool bar with new, open, save, copy, and paste buttons
-
Status line that shows the current time
-
Text edit area for editing text files
-
The example uses a border layout (toolbar is north, status line south,
text editor center)
-
The following JAVA classes are used:
-
FileDialog - pops up a file selection dialog box
-
JTextArea - handles the text editing (contains clipboard and file i/o methods)
-
JScrollPane - pane the holds the JTextArea object and provides scolling
functions
-
JOptionPane - used to pop up error message boxes
-
FileReader and FileWriter - read/write the text files
-
Timer - used to generater events to update time in the status line
-
JLabel - static text area object used for the status line
-
BorderLayout - to layout the toolbar, status line, and editor objects
-
JPanel - used to control the content area of the application
-
JFrame - used to create the application window
-
SimpleDateFormat - used to format time/date object
-
Date - used to hold the current time
-
JMenuBar, JMenu, and JMenuItem - used to construct the menu structure
-
JToolBar, JButton, ImageIcon - used to create the toolbar
-
ActionListener - implemented to receive timer, menu, and toolbar events
-
KeyEvent, KeyStroke - used to access keyboard constants for accelerators
and mnemonics
-
String - used to hold string data items
-
This application was built in two java files:
-
TextEditor - creates the main application frame, menus, toolbar, and status
line
-
EditorObject - handles the text editing, scrolling pane, file I/O operations,
clipboard operations
-
Other Notes :
-
toolbar and menus use the same listener classes, this reduces code duplication.
-
to run the program simply compile the java files and type java TextEditor
(note, the editor needs to have its toolbar gifs in the same director since
they are loaded at run time. Later we will learn how to create something
called an executable jar file that can hold a complete program in one file).
Click here to see all the code
Click here for a zip file with all the code
FileDialog, JOptionPane
-
FileDialog is an AWT control that allows you to prompt the user for a file
name.
-
To use the FileDialog
object
to prompt the user for a file name you must:
-
Create a FileDialog object and tell it to be visible
FileDialog dialog
= new FileDialog(parent, "Open",FileDialog.LOAD); // create a filedialog
object for reading
dialog.setVisible(true);
// set the dialog to be visible
-
Once the filedialog object is visible your program will wait for a response,
then you should check getFile() to see if a file was selected. getFile()
will return a null if the user pressed cancel.
if(dialog.getFile()
== null) // get the file name selected, if its null then no
file was selected, just exit
return;
-
Once you know something was selected, then you can build the full path
to the file by added the results of getDirectory and getFile
fileName
= dialog.getDirectory()+dialog.getFile(); // create a full file name
-
When you create the FileDialog object you can use two options for the third
parameter, LOAD or SAVE. If the option is load, then the file must exist.
If the option is SAVE, then the FileDialog will ask the user whether or
not they want to overwrite a file that already exists (should they select
an existing file).
-
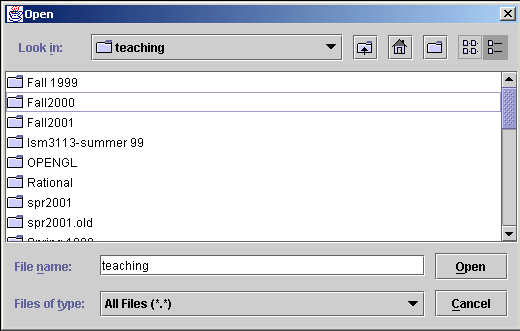
An alternative to FileDialog is the Swing control JFileChooser.
This is covered in more detail in chapter 14.
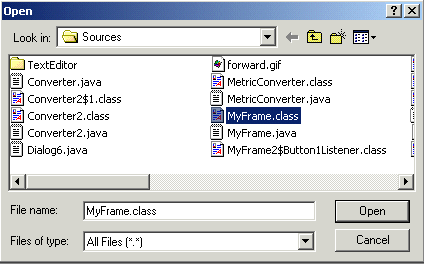
Example FileDialog display
Example JFileChooser display
-
JOptionPane
contains a collection of useful message dialogs. JOptionPane makes
it easy to pop up a standard dialog box that prompts users for a value
or informs them of something. For information about using JOptionPane,
see How
to Make Dialogs, a section in The Java Tutorial.
-
While the JOptionPane class may appear complex because of the large number
of methods, almost all uses of this class are one-line calls to one of
the static showXxxDialog methods shown below:
| showConfirmDialog |
Asks a confirming question, like yes/no/cancel. |
| showInputDialog |
Prompt for some input. |
| showMessageDialog |
Tell the user about something that has happened. |
| showOptionDialog |
Allows you to specify what goes on the option buttons |
-
Since JOptionPane dialog routines are "static", you don't have to create
a JOptionPane object in order to use them. Merely call the method with
the class name before the method name, e.g. JOptionPane.showConfirmDialog(...).
-
Each show method requires a reference to the parent frame and parameters
that determine what goes in the banner area of the box, what icon appears,
and what buttons appear. Reference Java Documentation for all the possible
combinations. With the exception of the showMessageDialog, all the dialogs
return a value (either integer or string) that indicates what the user
pressed or entered.
-
Other notes:
-
chapter 11 has more notes on JOptionPane
-
Note, in the example code I referenced the parent frame by using OptionPane.this
(rather than a plain old this). I did that because the calls to
JOptionPane.showXXX appeared in an inner class, if I had referenced just
this
in
the inner class then I would be passing a reference to the inner class
object, not the frame object.
-
Examples:
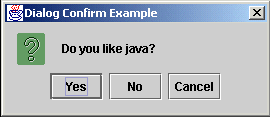 ConfirmDialog
Example
ConfirmDialog
Example
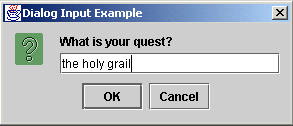 InputDialog
Example
InputDialog
Example
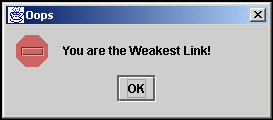 MessageDialog
Example
MessageDialog
Example

OptionDialog Example
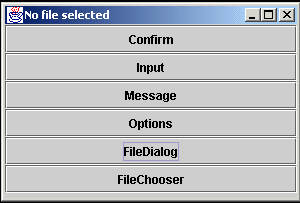
click here for the source code for this example
Key Terms:
content pane,controller, event model, layout manager, lightweight
component, listener, model, Model-View-Controller(MVC), peer model , view,
widget hierarchy.
Suggested Exercises: 1,2, 5,6, 7, 8, 9, 10, 14, 15.